Jedi Robe
This is the method that I used to make a Jedi Robe and it
turned out great.
Sketches and commentary by WiliQueen describing the structure
of the Jedi Robe
Cloak Construction
From WiliQueen's post to Ping on the discussion list
About the cloak construction...the shoulders just sort of
run right into the sleeves (cut all in one piece--see particularly
the shot of Obi-Wan on pg. 24 of the official souvenir mag), and
then the curve into the sleeve under the arm happens wherever
it makes sense for the fullness of the sleeve & of the body.
(Gee, that was clear as mud, huh?) I'm planning to use a plain
vanilla cloak pattern, Simplicity 7438 (they have a frame setup,
so I can't send you directly to it, but it's the seventh picture
on the linked page, and you can click on it for more info on the
pattern), and add the sleeves directly to the front and back pieces
of it. (I won't use the hood part of this pattern, as it's not
big enough for the Obi-Wan/Qui-Gon style hood, although it would
work for a Mace Windu style costume.) The normal construction
of this pattern doesn't have the pleats in the back, so I'm going
to add a couple inches to the back seam edge of each back piece
to compensate.
To get the right length when adding the sleeves, measure your
from the nape of your neck to wrist, then add a few inches for
the back seam and the wrist hem (however wide you plan to make
that hem; Obi-Wan's, at least, is really wide). There's a natural
shoulder slope on the cloak pattern, and I'm going to follow that
line straight out to the end of the sleeve on top. Then pick a
point about 12 inches from the top of the sleeve to put the bottom
curve on the side of the body pattern piece, and extend it out
and slightly down into the flared sleeve shape. *See
"Design Revision" Below
Another place, oddly enough, where you can see the sleeve
construction really clearly is in the Weird Al video! His sleeves
go straight out like rectangles instead of flaring down, but otherwise
they're right on the money. And he does a lot of gesturing with
his arms out to the side so you can see the sleeve really well.
Design Revision
I'm still using Simplicity #7438 as a base, because I've used
it for basic cloaks several times and it really is a great shape
for the drape of the Jedi robes...will give you a nice graceful
curved hem all around, without the odd angles you can get at the
sides if you use rectangular or trapezoidal body pieces. (BTW,
I've decided that the robes aren't actually longer in the back,
as I've said before they might be; they just tend to hang more
toward the back when worn open with the hood down.) The measurements
for the width of the sleeves on this new sketch are based on BouncyBen,
the life-size cardboard Obi-Wan who was liberated from plugging
Mountain Dew in some grocery store to provide inspiration in my
workroom. *eg* (Once again, eBay proves its wonderfulness...)
The estimate I gave for the sleeve width on the last version of
this turns out to be about 6" too narrow. I wish I had measured
this stuff on BouncyBen before, but he wasn't unpacked yet.
Anyhoo, here's the new version:
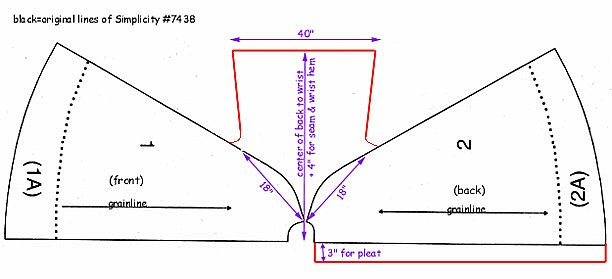
 The seams are straight at the sides,
but the hoods are gathered across the back. (On Qui-Gon and Obi-Wan,
anyway; Windu's hood doesn't seem to be gathered, or quite as
large.) There's about a 2-inch pleat on either side of the center
back of the body of the robe; the rest of it is straight at that
neck seam.
The seams are straight at the sides,
but the hoods are gathered across the back. (On Qui-Gon and Obi-Wan,
anyway; Windu's hood doesn't seem to be gathered, or quite as
large.) There's about a 2-inch pleat on either side of the center
back of the body of the robe; the rest of it is straight at that
neck seam.
The hood is cut in one piece, with a seam at the back but
not at the top. Obi-Wan's hood has a narrow double hem around
the front edge and a self fabric binding over the raw edges of
the neck seam. Qui-Gon's seems to be fully lined, with the raw
edges of the neck seam bound between the two layers; I can't tell
for sure because it's so much darker.
There is a seam down the center back of the robe, at least
on Obi-Wan. (And I can't imagine that they could make one for
Mr. Neeson without one...fabric isn't manufactured wide enough
to cut that in one piece for someone his size, since a person's
armspan is approximately equal to his height.)
The robe sleeves have a very wide hem, about 3 inches. This
probably contributes enough weight to make them hang properly.
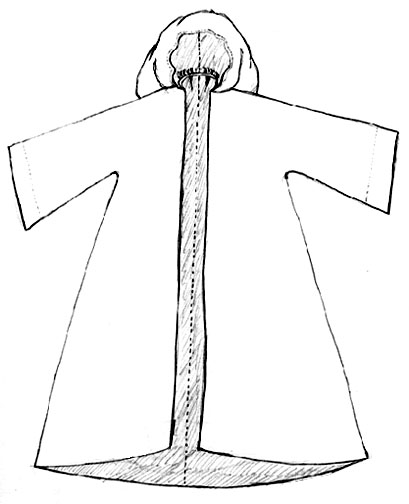
First, a front-view sketch of the whole thing, showing the
sleeves cut in one piece with the body.
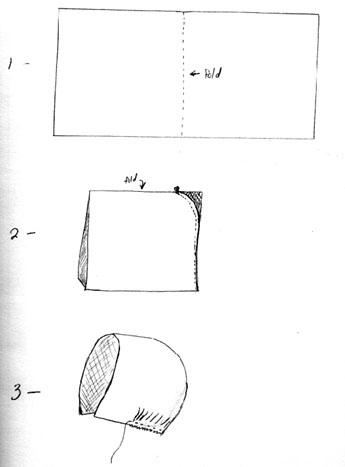
Three steps to making the hood (as seen on Obi-Wan & Qui-Gon
in TPM):
1. Cut a long rectangle, about 45" x 25".
2. Fold it in half, clip a curve around the top corner, and
stitch the back seam.
3. Gather the back part of the bottom edge before attaching
to body of robe.
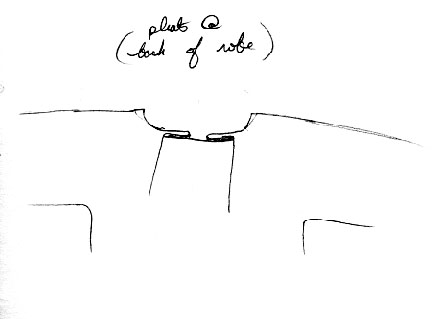
And finally, this is what I meant by putting a soft pleat
on either side of the center back--fold the neck edge like this
before attaching the (already-gathered) hood.
Thanks so much to WiliQueen for these great instructions.
Please visit WiliQueen's website at http://wiliqueen.dreamhost.com/
Modifications to WiliQueen's Jedi Robe Instructions
Provided by Maulwalker
There are three modifications that will make WiliQueen's design
even more accurate:
Sleeves - instead of 40" at the wrist, make them 50".
Back Pleat - make it deeper than 3". I made one 5"
deep which worked perfectly on the XL size pattern.
Hood - instead of 45" x 25", make it 50" x
25" This provides the correct drape around the face when
the hood is worn up.
Another Approach...
Instructions provided by "Got Maul"
What I ended up doing, which is up to you, was using the Simplicity
pattern 8291 under Costumes, using # 4. I took the pattern and
altered the cuff legnths to 22". Now what I mean by using
2 whole pieces for the body unit is that if you look at the research
of the Jedi robe, there is no top seam on the shoulders or any
seem from the nape of neck to the shoulders. There is only one
big seem from the cuff of the sleeve all the way to the bottom
of the robe. This suggests that the fabric was folded in half,
and cut using the folded edge of the fabric as the top of shoulder
and sleeve. So I did this with the pattern :
(1) as mentioned above, brought the cuff to 22",
(2) brought the armpit a few inches higher
(3) and CURVED it out, instead of having a sharp 90 degree
angle of a meeting point between the sleeve and the body
(4)and continued down the pattern using the "large"
lines for the bust and faded into the "XL" from the
waist to the feet, to give way to extra flowiness of the robe.
Trust me, it turned out good ( and I do not just settle for
anything, but have a meticulous eye for detail, even the way the
fabric edges were hemmed). For the Hood, I followed Queen Willie's
page on this one...and that turned out not only perfect, but easy
as well.